Flutter Basics - Adding Multiple Screens
Adding navigation to your app and passing data using routes!
Until now in the series, our discussion has been around single-page/screen apps. If you were eagerly waiting to build multi-screen apps this is where we are going to do it! Here, we will have a look at how we can add multiple screens to our app and navigate between them.
Also, we will see how we can pass data between widgets as well as via routes. I know you are pumped up for this article so let's dive in!
The Example App
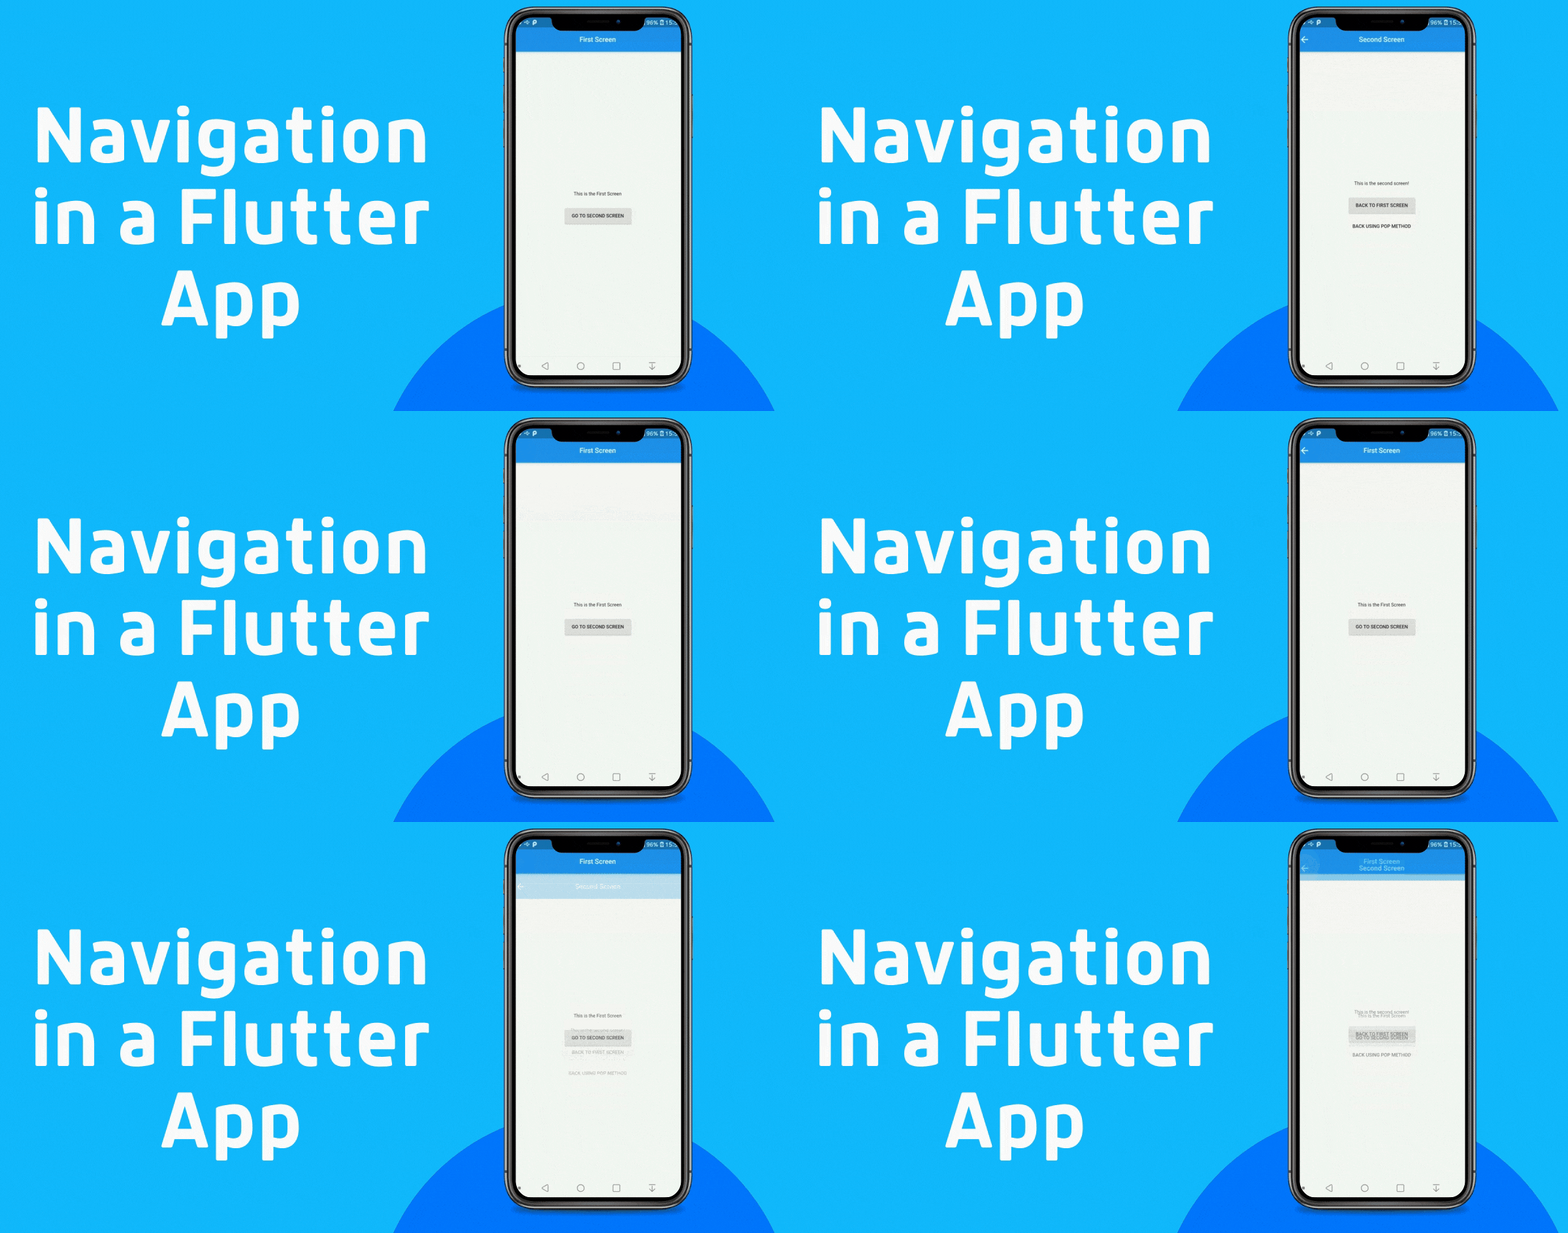
Below is an overview of an example app that we are building,

As you can see, we have two screens in this app. Also, we pass data from one screen to the other. So let's see how we can build this!
The First Screen
Below is a snapshot of the code of the first screen that we use in this application. This is totally a separate widget that we write in a separate first_screen.dart file and import it in the main.dart file later. We do this to reduce the visual bulk of the code as well as for easier maintenance and to optimize performance.
import 'package:flutter/material.dart';

import './second_screen.dart';

class FirstScreen extends StatelessWidget {
  static const routeName = '/first-screen';
  @override
  Widget build(BuildContext context) {
    return Scaffold(
      appBar: AppBar(
        title: Text('First Screen'),
        centerTitle: true,
      ),
      body: Column(
        mainAxisAlignment: MainAxisAlignment.center,
        crossAxisAlignment: CrossAxisAlignment.center,
        children: [
          SizedBox(height: 20, width: double.infinity,),
          Text('This is the First Screen'),
          SizedBox(height: 20),
          RaisedButton(
            onPressed: () {
              Navigator.of(context).pushNamed(SecondScreen.routeName);
            },
            child: Text('GO TO SECOND SCREEN'),
          ),
        ],
      ),
    );
  }
}
We can see that the FirstScreen is a stateless widget. This is a pretty niche widget in which all we have is a Scaffold which holds the appBar and the body. The body holds a Column widget which in turn holds a SizedBox, Text, and a RaisedButton. When the button is pressed a named route pushes the second screen on top of the first screen. More details on this later.
To make Flutter aware of the screen that we want to navigate to we need to specify the name of the route which points to that screen. Hence, we import the second_screen.dart file from the specified location.
Note,
Every screen(each scaffold widget is treated as a separate screen), that we need to navigate to should have its own unique identifier name. Here, we have defined
routeNameas a static constant in both the screens!
The Second Screen
The second screen which also lives in a separate second_screen.dart file consists of the following code,
import 'package:flutter/material.dart';

import './first_screen.dart';

class SecondScreen extends StatelessWidget {
  static const routeName = '/second-screen';
  @override
  Widget build(BuildContext context) {
    return Scaffold(
      appBar: AppBar(
        title: Text('Second Screen'),
        centerTitle: true,
      ),
      body: Column(
        mainAxisAlignment: MainAxisAlignment.center,
        crossAxisAlignment: CrossAxisAlignment.center,
        children: [
          SizedBox(height: 20, width: double.infinity,),
          Text('This is the second screen!'),
          SizedBox(height: 20),
          RaisedButton(
            onPressed: () {
              Navigator.of(context).pushNamed(FirstScreen.routeName);
            },
            child: Text('BACK TO FIRST SCREEN'),
          ),
          FlatButton(
            onPressed: () {
              Navigator.of(context).pop();
            },
            child: Text('BACK USING POP METHOD'),
          ),
        ],
      ),
    );
  }
}
The widget/screen has basically the same code structure as the first screen with an extra button. Here, we import the first_screen.dart file so that we can use its static const that is defined to navigate to it. The second button which is a FlatButton is used to navigate to the first screen using the pop() method. pop() method simply removes the topmost widget/screen from the stack. We will discuss this in detail further.
The main.dart file
We are not done with setting up the navigation yet! We also need to register all the routes of all the screens that we have in our MaterialApp widget which lives in the main.dart file. Below is a snapshot of our main.dart,
import 'package:flutter/material.dart';

//screens
import './first_screen.dart';
import './second_screen.dart';

void main() => runApp(MyApp());


class MyApp extends StatelessWidget {
  @override
  Widget build(BuildContext context) {
    return MaterialApp(
      title: 'Navigation Demo App',
      debugShowCheckedModeBanner: false,
      theme: ThemeData(
        primarySwatch: Colors.blue,
        visualDensity: VisualDensity.adaptivePlatformDensity,
      ),
      home: FirstScreen(),
      routes: {
        FirstScreen.routeName: (ctx) =>FirstScreen(),
        SecondScreen.routeName: (ctx) => SecondScreen(),
      },
    );
  }
}
Above, we can see that we have imported both the widgets/screens, i.e, first_screen.dart and second_screen.dart in our main.dart file. For the default home: we are using FirstScreen() as the initial widget/screen when the app launches.
You will also notice that we have mentioned routes which is the application's top-level routing table. This is all the code we need to enable navigation in our app. If you have multiple screens all the screens need to be registered in this routes: table.
Why this routes: app-level routing table?
The way that Navigator works in Flutter is like when a named route is pushed via a button click or some other event (maybe a change in app state) then Flutter looks up the route-name in this map.
If the name is present then the associated builder(){...} method, i.e, WidgetBuilder is used to construct a MaterialPageRoute that performs appropriate animations and transitions to the new route.
Some points to remember when using Navigator,
If the app only has one page, then we can specify it using
homeinstead.If
homeis specified like in this case of our app, then it implies an entry in this table for theNavigator.defaultRouteNameroute/, and it is an error to redundantly provide such a route in the routes table.If a route is requested that is not specified in this table (or by home), then the
onGenerateRoutecallback is called to build the page instead.The
Navigatoris only built if routes are provided (either viahome,routes,onGenerateRoute, oronUnknownRoute). If they are not built thenbuildermust not be null.
Some Navigator.of(context)... methods and how they work?
You would have noticed by now that Navigator ships with some cool methods straight from the Flutter Factory. Let's have a quick look at some of them! For more details on the Navigator refer to the official article.
❖ push() method
To switch/navigate to a new route this method can be used. This method adds a Route to the stack of routes managed by the Navigator. You might ask here that how do we mention the routes then? or is it required to mention the route in the MaterialApp?
Well, you can create your own, or use a MaterialPageRoute, which is useful because it transitions to the new route using a platform-specific animation. For example,
Navigator.push(
  context,
  MaterialPageRoute(builder: (context) => SecondScreen()),
);
Here, the route is built dynamically on the go by Navigator. This is quite useful when navigating in cases like, from a list of products to the details of a particular product, etc.
This pushes the new widget on top of the old widget, i.e, stacking on top of the old one. Flutter also gives a
←button automatically on top which when pressed removes the widget from the top of the stack and reveals the next underlying widget.
❖ pushNamed() method
If you have your widget as a named route and have mentioned the route in the app-level routing table this method then this method can be used. This tells Flutter to build the widget defined in the routes table and launch the screen. This is what we have used in our demo application.
Navigator.of(context).pushNamed(SecondScreen.routeName);
❖ pushReplacement() method
This works the same as of push() method except the difference is that the next route that builds the widget does not push it to the top of the stack rather it replaces the current screen/widget that is being displayed and pushes the new widget in place.
It does not give a ← as in the case of push() method and hence as the previous widget/screen has been replaced already, the next to the replaced screen will appear if we pop our new screen using the pop() method.
Navigator.pushReplacement(context, MaterialPageRoute(builder: (BuildContext context) => SecondScreen()));
❖ pushReplacementNamed() method
As the name suggests this method also replaces the currently displayed screen/widget with the new widget. It is a named replacement so we need to specify the route name in the app-level route routing table.
Navigator.of(context).pushReplacementNamed(SecondScreen.routeName);
❖ pushNamedAndRemoveUntil() method
In case you are building a social media app like Facebook or Instagram you would like to use this method in some cases. For example, the user authenticates(signup/login) to your app, browse profiles, scrolls the news feed, and lastly logs out of the app.
In this case, you can't just push a HomeScreen or just any screen that you would be displayed when logged out. In that case, you would like to remove all the routes in the stack so that users cannot go to the previous routes basically this method will clear your screen stack!
Navigator.of(context).pushNamedAndRemoveUntil('/auth-screen', (Route<dynamic> route) => false);
❖ pushAndRemoveUntil() method
This works similarly to pushNamedAndRemoveUntil() method but the difference is that instead of pushing a named route this uses the MaterialPageRoute builder method.
❖ pop() method
As the name suggests this method removes the screen at the topmost layer of the stack. When only a push() or pushNamed() method is used to push a new screen on the stack Flutter automatically gives a ← button on that screen.
Navigator.of(context).pop();
This method can also be used to close other widgets that are overlayed on top of other widgets like, modal bottom sheet, dialog, etc.
These are all the major Navigator methods that you will come across and use while building your app and depending on the needs and functionality that you require.
Why use a static const for a named route?
You can simply use the route names by specifying the names directly in the app-level routing table and then using them in the navigator by their actual value. But once you need to update a route name, you need to update them at all the places that you have used.
Also if there is a typo while using them in the navigator this will give unknown errors and bugs that are quite difficult to trace and certainly can lead to frustration😡😩😤😖. Hence we use a static constant and assign the name that we are going to use to a variable.
Now the actual value lives inside the widget and we can change it whenever required without the hassle of changing at multiple places. This is the more elegant approach of assigning and using route names.
Passing data via routes as arguments
If you need to pass data around from one screen/widget to another using the routes you can do it for sure! Consider an example where we have a list of recipes and on clicking the recipes we should navigate to a different screen that shows the recipe details of that particular recipe.
In the recipe details screen we at least need to know the ID(recipe_id) of which recipe was clicked so that we can fetch it from the backend/server. So to pass the recipe_id from the recipe list screen we will write,
Navigator.of(context).pushNamed(RecipeDetailScreen.routeName, arguments: recipe_id);
Here you can see that we are passing recipeId as route arguments. Now in the second screen, i.e, where we need this recipe_id we can extract data from the route arguments like this,
final recipeId = ModalRoute.of(context).settings.arguments as String;
And finally, we have the data of our previous screen into our current screen. This is a pretty basic example to understand the flow of data.
Conclusion
That was all the basics of Navigation that you needed to know before diving deeper. We will see much more examples and Navigation in action in the upcoming articles. Hope you enjoyed this post! If you did then leave some emojis on the post.
Also, share this article and the whole series with your other dev buddies. Till then, Happy Coding👨🏽💻👩💻!
